step by step we are gonna show you how to remove second generation Acura nsx front bumper
1: put jack under front tire section or lift whole car
2: open the hood
3: remove front tire left and right

4: remove fender carpet liner and remove plastic pin clips from carpet total 6 pin

Step 5: Remove “3” 10mm bolts per side (right/left) fender, attached to base of fender liner.
Step 6: Pull fender liner back from bumper, remove “3” T30 bolts. (refer to picture)

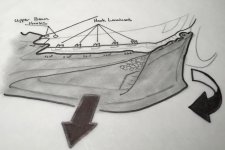
Step 7: Remove “24” T30 bolts under bumper retaining bumper to skid guards & supports, as well as 4 screws across the top of the bumper (located under Hood). (refer to picture above)
Just please follow all step to make sure no mistake !
Step 8: Pull out the front bumper at the wheel arch area to release it from the hooks on the upper beam. (refer to picture below)

Step 8: With help of a assistant, while pulling the front bumper away from the upper beam, release the bumper from the hooks on the upper beam. (refer to picture below)

Step 10: With the bumper pulled a few inches from the vehicle, disconnect the sensors from the bumper.
Step 11: With everything removed, the bumper can now be safely removed and set aside.


1: put jack under front tire section or lift whole car
2: open the hood
3: remove front tire left and right
4: remove fender carpet liner and remove plastic pin clips from carpet total 6 pin
Step 5: Remove “3” 10mm bolts per side (right/left) fender, attached to base of fender liner.
Step 6: Pull fender liner back from bumper, remove “3” T30 bolts. (refer to picture)
Step 7: Remove “24” T30 bolts under bumper retaining bumper to skid guards & supports, as well as 4 screws across the top of the bumper (located under Hood). (refer to picture above)
Just please follow all step to make sure no mistake !
Step 8: Pull out the front bumper at the wheel arch area to release it from the hooks on the upper beam. (refer to picture below)
Step 8: With help of a assistant, while pulling the front bumper away from the upper beam, release the bumper from the hooks on the upper beam. (refer to picture below)
Step 10: With the bumper pulled a few inches from the vehicle, disconnect the sensors from the bumper.
Step 11: With everything removed, the bumper can now be safely removed and set aside.